
The manual path moves Smart Issue Templates data from Jira Data Center to Jira Cloud without the Jira Cloud Migration Assistant (JCMA). You export files from Data Center, then import them here, one file per kind of data.
This is the alternative path. Use it when the Automated migration (Recommended) cannot complete, when JCMA is not an option for your site, or when you want a copy of your data you can keep.
To create the files, follow Manual migration (Alternative) in the Data Center documentation.
1. Before You Begin
|
Requirement |
Details |
|---|---|
|
Cloud Plugin Version |
28.0.0 or higher |
|
DC Plugin Version |
3.1.9 or higher (Jira 10 and below) or 4.0.5 or higher (Jira 11) |
|
Cloud Permissions |
Jira administrator. The Import option is only shown to Jira administrators |
-
The projects, work types (issue types), groups and users your data points at should exist on the Cloud site before you import. Anything that cannot be matched is listed before the import and left out; the rest of the item is still imported.
-
Users are matched by email, using the list of users included in each exported file.
2. Import Order
Import the files in this order. Templates refer to scopes, and hierarchies refer to both.
|
Order |
File |
Guide |
Most per file |
|---|---|---|---|
|
1 |
|
1,000 scopes |
|
|
2 |
|
500 templates |
|
|
3 |
|
100 hierarchies |
If a file holds more than the limit, the import stops with This file holds N ... The most that can be imported at once is ... Contact support if your Data Center export is larger than these limits.
3. How an Import Works
The steps are the same for scopes, templates and hierarchies:
-
Open Smart Issue Templates and go to the listing in the top menu: Scopes, Templates > Issue Templates, or Hierarchies
-
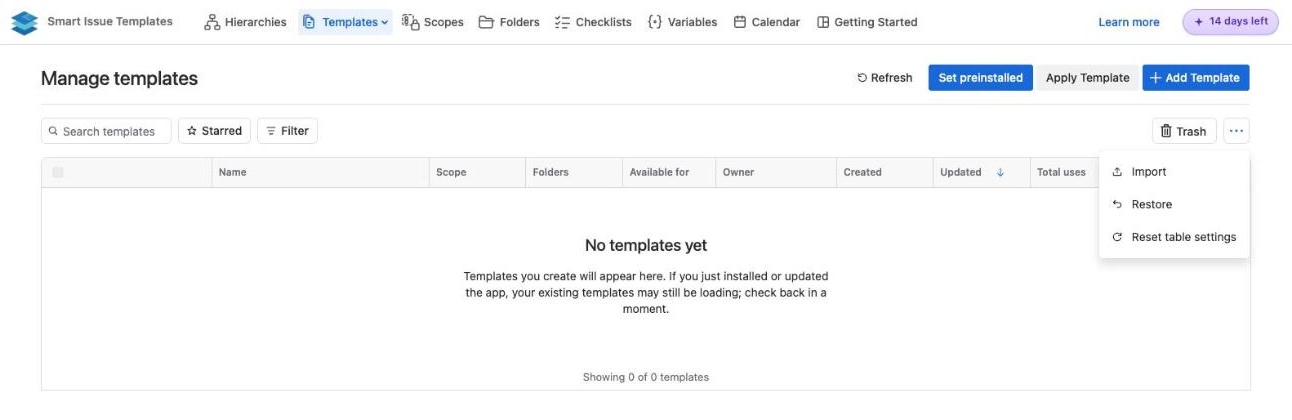
On the listing page, open the More actions (...) menu and select Import
-
Choose the file exported from Data Center. JSON and XML exports are accepted, and password-protected exports ask for the password
-
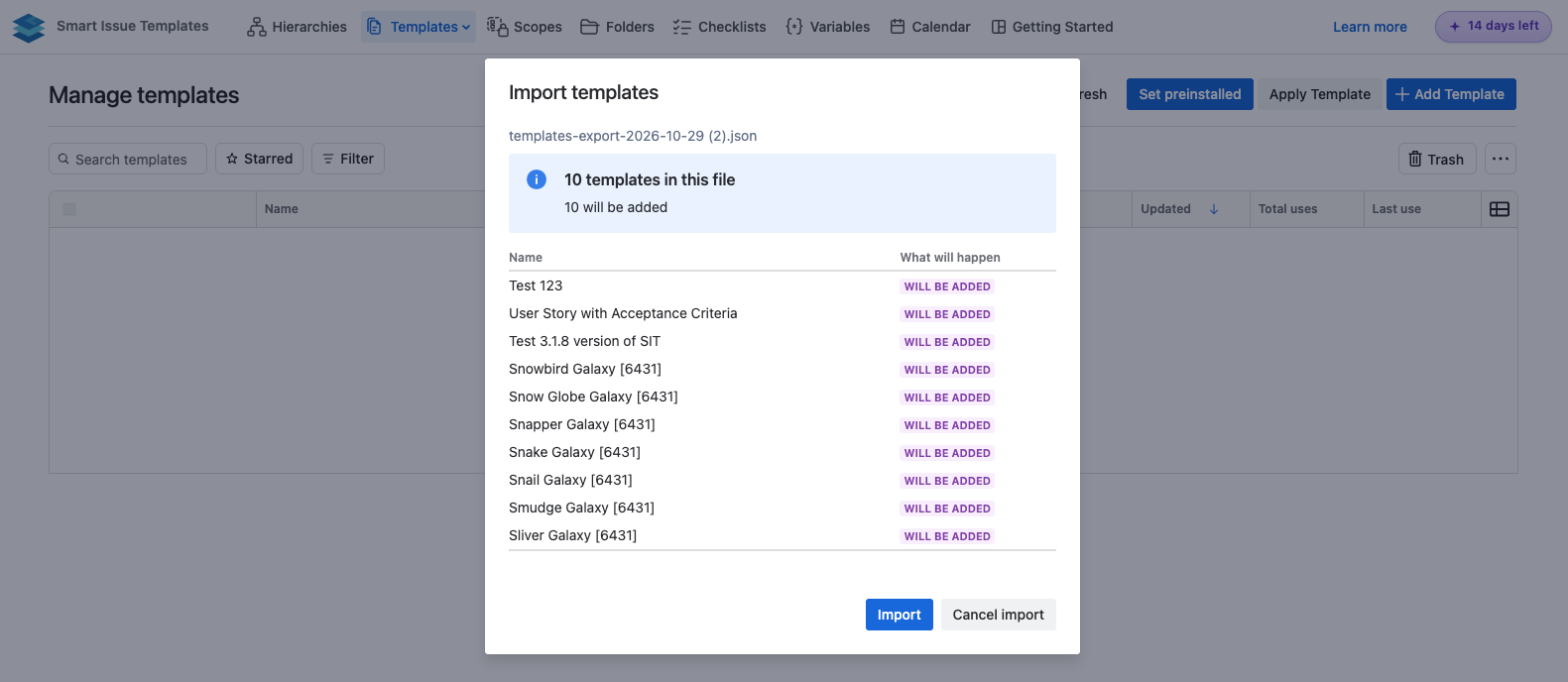
Review the preview: N ... in this file, with what will happen to each entry
-
Click Import, or Cancel import to stop
-
Keep the dialog open while it runs: Large selections run in batches. Keep this dialog open until it finishes.
-
Read the result, for example 12 added, 0 replaced, 0 restored, 0 left alone, 0 failed, then click Close
What the preview tells you
|
What will happen |
Meaning |
|---|---|
|
Will be added |
The entry is new on this site |
|
Will be replaced |
The entry was imported before and has changed. Replacing overwrites what is on the site now. Anything not in this file is left alone. |
|
Will be restored from the trash |
The entry was imported before and then deleted |
|
Already here |
The entry is on the site and has not changed. It is left alone |
When some references cannot be matched, the preview shows Some of this file cannot be matched on this site, with one line per kind (for example Projects this site does not have) and up to 8 names each, followed by Everything else is imported. What is listed here is left out.
Importing the same file again
Entries are matched by their identity, not by name, so importing an updated export again replaces what changed and leaves the rest alone.
Do not use both paths for the same data. Records created by the automated migration and records imported from a file are not matched to each other, so importing a file after an automated migration can create copies.
See also Migrate from Data Center to Cloud for known limitations and frequently asked questions.