.png)
Quick Overview
Import DC templates into Cloud from a .json file exported from SITDC.
Because Cloud uses different IDs, the import maps spaces, work types, owners, and fields. Intelligent Auto-Fill speeds this up (configure the first template → auto-apply to the rest); otherwise map each template manually.
Use this page for JSON file import. For Atlassian’s JCMA migration path, see the JCMA guide instead.
To Import the Template from ‘Smart Issue Templates for Data Center’ to ‘Smart Issue for Cloud’ you need to create Templates on the Data Center and Export them. You can Export one or several Templates at one time and you`ll receive a ‘.json’ file with these Templates. After that, you can start to Import these Templates to the ‘Smart Issue for Cloud’.
How to Import the Template from Data Center:
-
Export Template from Data Center.
-
Open the Jira Cloud.
-
Go to the Apps > Manage your apps > Smart Issue Templates > Settings.
-
Enable the ‘Import ability enabled’.
-20251212-183445.png?cb=1a67a74504e48709b343a1b4e6e9abe4)
-
Open the ‘Manage Templates’ page in the Smart Issue Templates app.
-
Click the ‘Import Template’ button.
-
Click the ‘Choose file’ button.
-
Select the file with the Exported Template from the DC.
-
Click the ‘Open’ button./Click the ‘Next’ button.
-
Fill in all required fields (Name, Project, Issue type, Owners, Assignee, Reporter).
-20251212-174710.png?cb=7ebf017edceb9a5ed9dfa2d38d042403)
-
Map the content fields (Assignee, Reporter, Fix Version, Components).
-
Click the ‘Next’ button.
-
Click the 'Import Template. button.
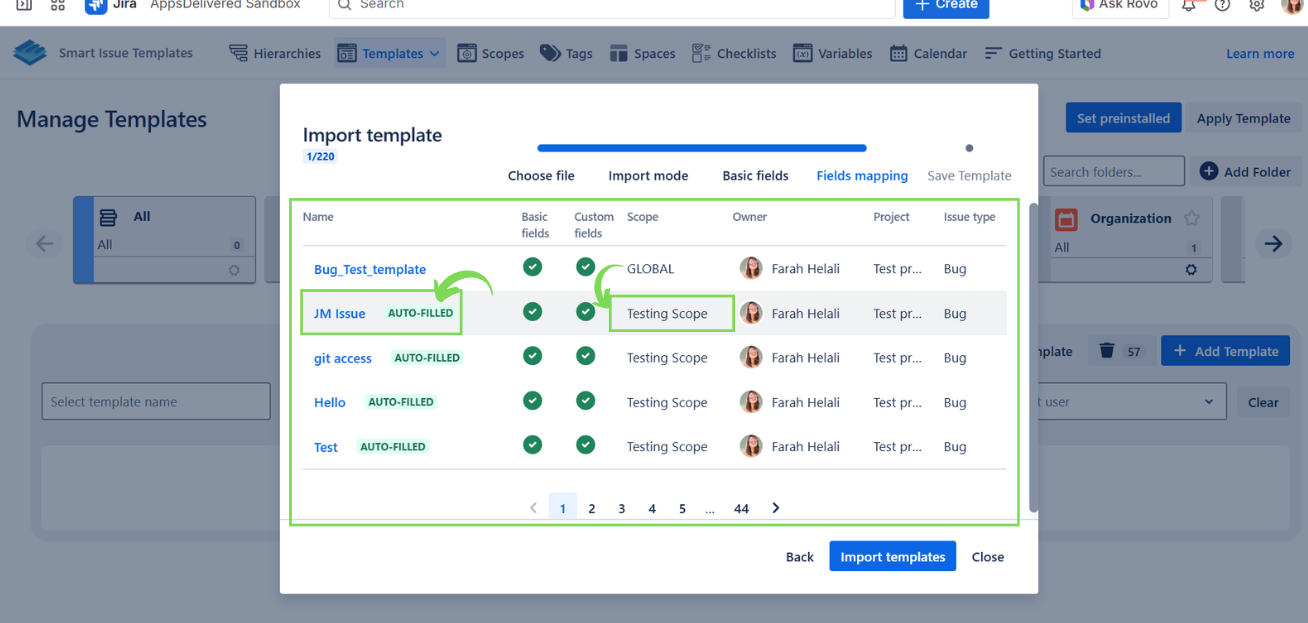
if a specific value can’t be matched in Cloud for a template, the import falls back to the first template’s selected value for that field (so the import can continue without blocking). This still lets the user review/edit before finishing.
-
Now the Templates were imported and can be used.
Want more fields supported and a faster import? Enable the Intelligent Auto-Fill mapping when importing templates. Without it, you'll need to manually map each template one by one, and only the basic fields listed below will be carried over.
Supported Template Fields
The fields that get carried over during import depend on which mode you use. There are two ways to import:
-
Manual Import -- you configure each template one by one. Only basic fields are available.
-
Intelligent Auto-Fill -- you configure the first template, and the system automatically maps all remaining templates using smart matching. Supports basic fields + custom fields.
When importing templates, you will select the following fields from a dropdown for each template:
-
Name: The title of the template.
-
Description: A brief overview or notes regarding the template.
-
Scope: The applicability or visibility range of the template.
-
Tags: Keywords or labels associated with the template for easier categorization and retrieval.
-
Owner: The user or group that owns or manages the template.
-
Project: The Jira project to which the template is associated.
-
Issue Type: The type of Jira issue that the template is designed for (e.g., Bug, Story, Task).
Supported Template Content Fields
The following content fields within the templates are supported for import:
-
Summary: A concise overview of the issue.
-
Description: Detailed information about the issue.
-
Assignee: The user assigned to address the issue.
-
Reporter: The user who reported or created the issue.
-
Fix Version: The product version in which the issue is expected to be resolved.
-
Components: The project components that are affected by or related to the issue.
Field Mapping (with Intelligent Auto-Fill)
When you enable Intelligent Auto-Fill, the app goes beyond the basic fields listed above. It automatically maps all supported fields -- including custom fields -- from your Data Center templates to their Cloud equivalents.
You only configure the first template. The system then applies smart matching to fill in the rest automatically.
The table below shows every field the system can map, its support level, and exactly how the value is transformed from DC to Cloud.
Fields
|
Support
|
Mapping Method
|
|---|---|---|
Name
|
|
Direct transfer - Template name is copied exactly as-is to the target Cloud instance. |
Summary
|
|
Direct transfer - Issue summary text is preserved without modification |
Project
|
⚠️ |
User selection required - You must manually select the target project during import. The original project context cannot be automatically mapped |
Issue Type
|
|
Name matching - Issue types are matched by name in the target project. If no match is found, import will prompt for manual selection |
Description
|
|
DC/DC wiki markup is automatically converted to Atlassian Document Format (ADF) for Cloud compatibility. |
Scope
|
|
Name matching - Scopes are matched by name within available scopes on the target instance. |
Assignee
|
⚠️ |
User lookup by name - The system attempts to find users by display name. May fail if user doesn't exist or has a different display name in Cloud. |
Reporter
|
⚠️ |
User lookup by name - Similar to Assignee. Falls back to current user if original reporter cannot be resolved. |
Fix versions
|
|
Name matching - Version names are matched within the target project's configured versions. Unmatched versions are skipped. |
Components
|
|
Name matching - Component names are matched within the target project. Unmatched components are skipped. |
Priority
|
|
Name matching with fallback - Priority is matched by name. If not found, defaults to "Medium" to ensure successful issue creation. |
Due Date
|
|
Format preserved - Date value is transferred in ISO format (YYYY-MM-DD). |
Labels
|
⚠️ |
Direct transfer - Labels are copied as plain text. Labels that don't exist in Cloud will be created automatically. |
Custom Fields
|
||
Date picker
|
|
Format validation - Dates are validated and converted to YYYY-MM-DD format. Invalid dates are skipped. |
Date time picker
|
|
Format validation - DateTime values are validated and converted to ISO 8601 format. |
Number
|
|
Numeric parsing - String values are parsed to numbers. Non-numeric values are skipped with a warning |
Text field
|
|
String preserved - Text content is transferred exactly as stored. |
Paragraph
|
|
String preserved - Multi-line text content is preserved, including line breaks |
Url
|
|
String preserved - URL strings are transferred without validation or modification. |
Group Picker
|
|
Name preserved - Group names are transferred. Ensure matching groups exist in Cloud. |
Checkboxes
|
|
Option matching by name - Each selected option is matched by its display name in the target field configuration. |
Single user picker
|
|
User resolution by display name - User is looked up by display name. Falls back to empty if not found. |
Radio buttons
|
⚠️ |
Option matching by name - Selected option is matched by name. If the option doesn't exist in Cloud, the field is skipped. |
Multi select
|
⚠️ |
Option matching by name - Each selected option is matched individually. Unmatched options are excluded from the import. |
Multi user picker
|
⚠️ |
User resolution by name - Each user is resolved individually. Users not found in Cloud are excluded. |
Single select
|
⚠️ |
Option matching by name - The selected value is matched by option name. Requires matching option to exist in the target field. |
Epic Link
|
⭕ |
Issue references not portable - Epic links reference specific issue keys that don't exist in the target instance. |
Parent
|
⭕ |
Hierarchy not transferable - Parent-child relationships are instance-specific and cannot be mapped across environments. |
Cascading Select
|
⭕ |
Nested options not supported - The parent-child option structure varies between instances and cannot be reliably matched. |
Sprint
|
⭕ |
Board-specific data - Sprints are tied to specific Scrum boards and cannot be mapped to different board configurations. |
Good to know
-
Availability - Fields with this
icon will be imported automatically with high reliability., fields with this icon ⚠️ are partially supported, and fields with this ⭕ icon cannot be imported due to technical limitations. These fields will be empty in imported templates.
If your Jira instance has multiple custom fields with the same name, the system may map values to the wrong field during import. To avoid this, make sure your custom field names are unique before importing. You can check for duplicates in Jira Administration > Work Items> Custom fields.